Using the “All items” listing
This article explains how to make use of the “All items” listing to search for a particular artifact or a particular category of artifact. This screen is also used to perform maintenance / bulk edit functions on the artifacts database.
Views
At the top of the screen is a dropdown box. This enables you to select different “views” of the lists of “items.” We can define the columns that are shown, which items are included or excluded, the filters that are available and the default sort order. New views can be added or existing views modified. Please contact the webmaster. Each view has been designed to fill a specific purpose.
Items – default view
This view should be all that most people need. It includes all “items” in the database and is sorted with the most recently published items on top.
New item approval
This includes all new items in Pending status and it is only visible to Administrators and Editors. These are items where the author has completed all inputs and has submitted the item to Museum management for final approval. Note the “Follow up” field. This field is used by Museum managers to flag items which require some editing.
Items recently modified
This contains all Published items in the database with the most recently modified at the top of the list. This view helps Museum managers to ensure that all edits are appropriate.
Items requiring attention
This view includes all Published items. Users can filter the list in many different ways looking for items where important fields have not been set or which have been set inappropriately. Examples include finding all items where:
- the item status is “Out for repair.”
- the follow-up status is “Yes”
- there is no featured image. (Select “Is not set” in the filter dropdown.)
- the condition code is “Poor.”
- a location has not been set.
- some combination of the above.
Possible featured artifact items
This view helps museum management ensure that as many interesting items as possible are included on the Featured Artifacts screen. The view is available only to Administrators and Editors and includes all items:
- With a featured image and
- No “display options” are set (See the Display Options topic) and
- Published items only.
The most recently published items are at the top of the list.
Display options
This view (available only to Administrators and Editors) includes only those items where one or more Display Options has been set. Users can filter this listing using the “Display options” filter.
Note that this listing includes only “items” – soldiers can also be selected for display at the top of the Home screen.
Filters
Set filter
Once a “View” has been selected, you will see a number of dropdown boxes at the top of the listing. Select any value from one or more of these filters and then click the Filter button. The list will be filtered so that only those items that match the value you selected will be displayed.
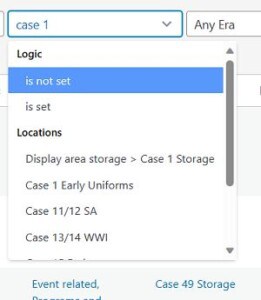 In some cases (“locations” in particular) there is a large number of possible values to choose from. You can type a value into the dropdown and the list will be searched as you type to find matches for what you typed in. (Just place your cursor into the dropdown box beside the word “Any” and start typing.) For example, if you type “Uniform” into the location dropdown, the system will display all locations with the word “Uniform” in the location name. The system works well when you enter a single word. However, if you want to search for “Case 2” the system will find all location names with the word “case” together with the number 2 somewhere in the location name.
To quickly find a particular location, we suggest that you use keywords such as “storage”, “wall”, “research”, “binder” or “box.”
Remove filters
Once you apply a particular filter, you can remove that filter by clicking on the “X” in the right hand end of the dropdown box. You must then click the Filter button to reset the listing.
To remove all filters, simply click “Clear filters” which is located beside the Filter button. Note that this will remove the pre-set filters so you must select a different view and then return to the view you were working with to reestablish the pre-set filters.
Editing
You can edit some aspects of the listed items without having to open the item, edit it and then save it. You can always edit the title of the item right on the item listing screen.
Editing individual items
Select the item you want to edit. A little pencil icon will appear below each of the columns that you can edit. Click the pencil icon under the column you want to edit. A listing of the available values will appear. Start typing to find the value you want to use and then click on that value. Save your selection by clicking the check mark (✓) to the right of the field.
Bulk editing
You can change the settings of a number of items at the same time. Select two or more items. A number of Bulk edit buttons will appear immediately below the column headings. Click the Bulk edit button in the column you want to edit. On the screen which appears, select “Replace with”, “Add” or “Remove.” Search for or select the value you need. Then click the Update button. Confirm your action and the system will edit all of the selected. items.